Rocket Project
Cover letter:
Near the end of physics, there was one last project to be done. This project used bottle rockets in order to teach us subjects such as calculating Max height, initial velocity, time of max height, and how to calculate the theoretical flight time of an object from a video. First up, we had to build a bottle rocket using multiple examples of rockets from a website that gives out multiple examples of bottle rockets. Then we had to test them out and refine them by issues we had while testing them. Then it was time to launch them for real. After doing that, we had to calculate position, velocity, acceleration, etc, in which position is what direction the rocket flew in, velocity is the directional speed of the rocket, and acceleration is how fast the rocket accelerated. And we had to calculate this using the quadratic formula (Ax^2+Bx+C) in which A,B,and C represent numbers, and A is not equal to 0.
Near the end of physics, there was one last project to be done. This project used bottle rockets in order to teach us subjects such as calculating Max height, initial velocity, time of max height, and how to calculate the theoretical flight time of an object from a video. First up, we had to build a bottle rocket using multiple examples of rockets from a website that gives out multiple examples of bottle rockets. Then we had to test them out and refine them by issues we had while testing them. Then it was time to launch them for real. After doing that, we had to calculate position, velocity, acceleration, etc, in which position is what direction the rocket flew in, velocity is the directional speed of the rocket, and acceleration is how fast the rocket accelerated. And we had to calculate this using the quadratic formula (Ax^2+Bx+C) in which A,B,and C represent numbers, and A is not equal to 0.
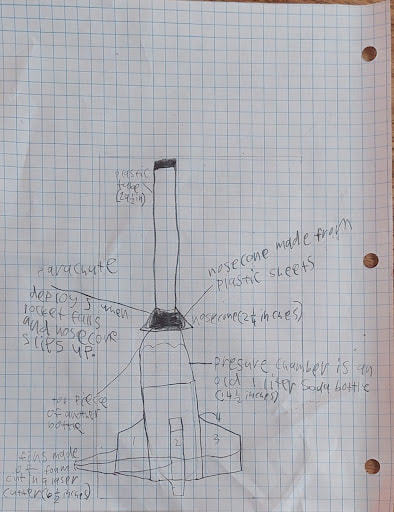
Blueprint:
Calculations:
Max Height: 186.5
To find max height we had to first draw a right triangle. In this triangle the adjacent is the camera we used to record our rocket’s launch’s length from the launcher, which was estimated to be 200 feet away, the opposite is the rocket’s horizontal distance from the launcher, which was 210 feet, the angle the rocket flew in was 43 degrees, and the hypotenuse was our max height. We had to calculate the results using SOH CAH TOA, and due to the fact that we did not have the hypotenuse, we had to go with TOA (opp/hyp) which gave us the formula tan(43)=y/200, which gave us our answer 186.5 feet for our max height.
Time of max height: 5 seconds
To calculate the time of max height, we had to download the video of our rocket launch and analyse it frame by frame until we find the one which represents the time of max height. When our rocket reached max height, it was 150 frames from the frame the rocket was launched at. Which gave us 5 seconds till we reached max height.
Initial Velocity: 298.27ft/s
After finding max height and time of max height, it was time to find initial velocity. We took what we knew, our flight time, 18 seconds, the force of gravity, 32ft/s^2, the height of the base, 1.5 and the max height, 186.5. We used flight time as t, gravity as g, base height as Y0, and max height of H(t). We plugged these values into the formula of initial velocity (H(t)=-½(g)(t^2)+V0(t)+Y0) and ultimately got the initial velocity, 298.27ft/s.
Theoretical Flight Time: 18.65 seconds
Finally, it was time to calculate the Theoretical Flight Time. We used the same formula for initial velocity, but with our initial velocity substituted for our initial velocity (298.27ft/s) with this, we had to find three numbers and label them A, B, and C. In our equation, we found that -½(32) which multiplies to -16 represents A, 298.27 represents B, and 1.5 represents C. After that, we had to put our A, B, and C into a quadratic formula calculator and get our theoretical flight time. We got two supposed results, -0.01 and 18.65. Because there is currently no way anyone can go back in time, and seeing as it is especially not a plastic bottle rocket, that means our theoretical flight time is 18.65 seconds.
Reflection:
My biggest challenge during this project must have been the struggle I had to make a nose cone. I just kept trying and trying to make a good nose cone but I just cannot produce a good nose cone. I kept trying to give up, but I was always pressured to make a nose cone. Finally, after what felt like a thousand attempts, I finally got a good nose cone, albeit, a little bit small. So we had to make sure the parachute fit under there due to the parachute release mechanism being that one where when the rocket falls from the sky, the nose cone slides up a tube and releases the parachute. But even with all the effort, it still did not deploy, although the rocket did fall sideways allowing it to fall slower.
I succeeded a fair amount of times during this project. But there are only two things that I can really think about. One is persevering through the nose cone struggle and finally coming out with a decent nose cone. Yeah, it was small, but a small one is better than none at all. The other one is the blueprint from above. I also managed to persevere through the bad writing shown on the rubric and make a decent blueprint, showing accurate sizes and descriptions. So in conclusion, the best advice I would give to next year’s sophomore class is to persevere and do your best. Because if you persevere, you can get your goals done eventually.
A good turning point for me during this project was the blueprint. The blueprint above is not actually the original blueprint, it is just a recreation. Unfortunately, the original blueprint was destroyed, I do not know how it was destroyed, it was just destroyed. Up to this point, I had the impression that I was not doing that much during this project, yeah, I made the parachute, but that was really just it. But when the time came to make a new blueprint, I rose to the occasion and crafted a new blueprint for our rocket. I can apply this in my life in this scenario, if I am not doing much, I gotta look for an opportunity, and if I find an opportunity, take it.
The only important thing I learned in this project is how to work with people. I feel like I did an example of what not to do until the end during this project. But now that I know what to do, I feel like I will be able to apply my knowledge of working with a group in future projects or even during my career. I have gained a newfound knowledge for working with people. Overall, failure is just a path to success.
If I were to do this project again, I would try my best to do more for my group. Yes I did something pretty important near the end, but overall, I only really helped my partner (Elias) with minor things. It was not till the very end when I rose to the occasion and worked very hard on the blueprint. And now I really wish I had done more in this project such as making the fins or making the pressure chamber. But, I suppose the blueprint at the end is ok as it is.
Rocket Launch:
Cookies project
Problem Statement:
Problem Statement: write 1-3 sentences that introduce the problem.
What is cheaper, the ingredients for a pizza or 8 hot dogs
Question: What is the goal or question you are answering in your problem?
Nearing the 4th of july a store manager is calculating what would be easier to do for 4th of July dinner, making a pizza from scratch, or buying 8 hot dogs.
Constraints: write a list of at least 3 different constraints about your two different products. Examples of this could be time, materials, cost of labor, storage space, ect.
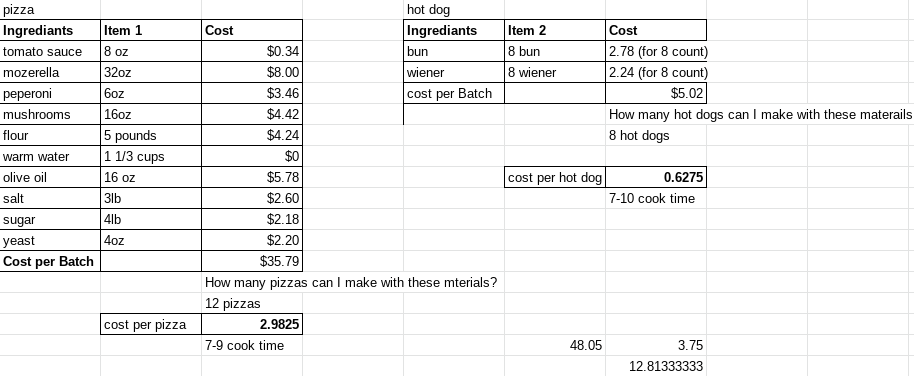
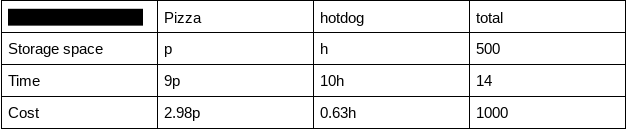
storage space (500 items in total), time (pizzas take 9 minutes to cook, hot dogs take 10 minutes to grill, store open 14 hours a day), cost (cost per pizza: $2.98, cost per hot dog: $0.63)
Hot dogs: 1. Also might not have enough in stock, 2. The sheer demand for hot dogs during 4th of july, 3. One ingredient can outsell the other
Pricing: Given a 300% markup, outline the sell price and the cost price below.
Pizzas: 8.94/2.98 Hotdogs: 1.89/0.63 layout: sell price/cost
Problem Statement: write 1-3 sentences that introduce the problem.
What is cheaper, the ingredients for a pizza or 8 hot dogs
Question: What is the goal or question you are answering in your problem?
Nearing the 4th of july a store manager is calculating what would be easier to do for 4th of July dinner, making a pizza from scratch, or buying 8 hot dogs.
Constraints: write a list of at least 3 different constraints about your two different products. Examples of this could be time, materials, cost of labor, storage space, ect.
storage space (500 items in total), time (pizzas take 9 minutes to cook, hot dogs take 10 minutes to grill, store open 14 hours a day), cost (cost per pizza: $2.98, cost per hot dog: $0.63)
Hot dogs: 1. Also might not have enough in stock, 2. The sheer demand for hot dogs during 4th of july, 3. One ingredient can outsell the other
Pricing: Given a 300% markup, outline the sell price and the cost price below.
Pizzas: 8.94/2.98 Hotdogs: 1.89/0.63 layout: sell price/cost
Solution
For this page for the cookies final project you will be giving a step by step solution to your own cookies problem. Your solution page should have all of the following:
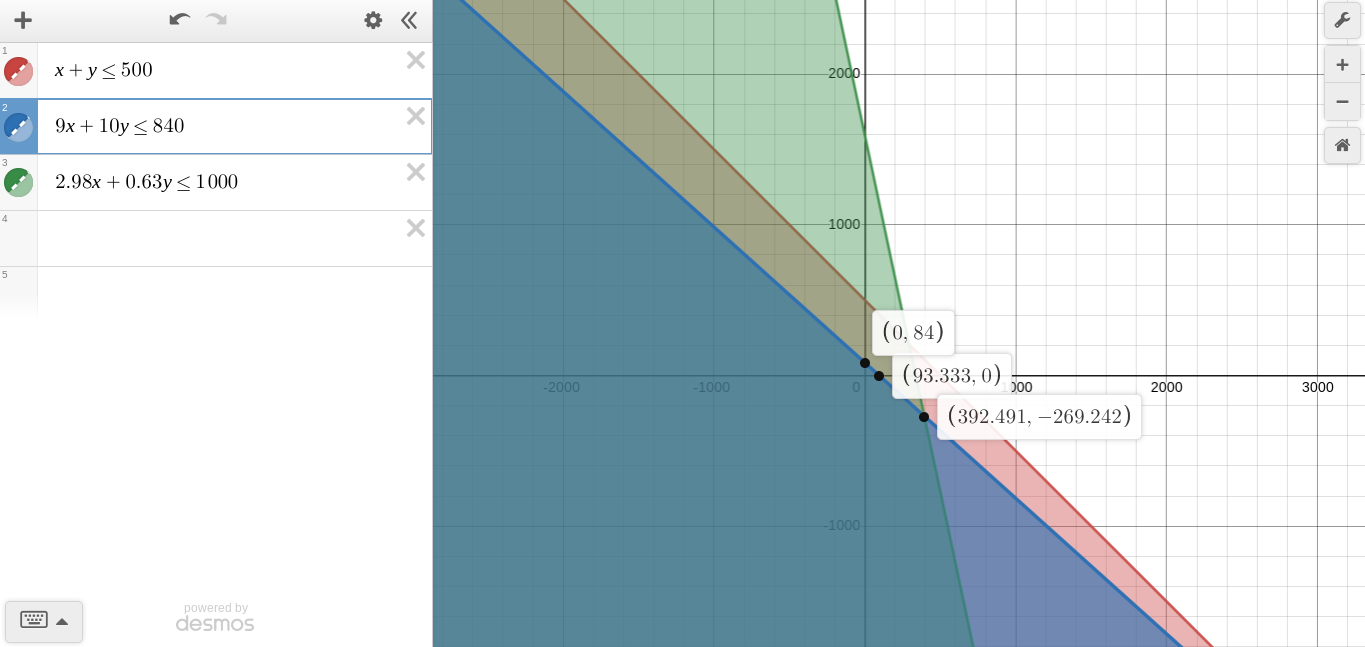
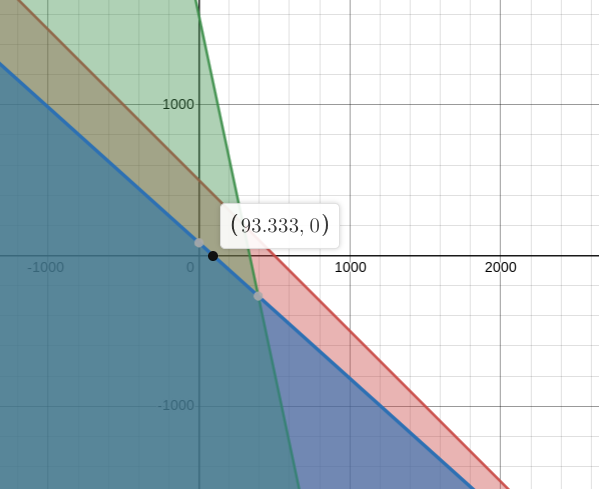
https://www.desmos.com/calculator/xe2nlsqjxn
All possible solutions:
(93.333,0)
This is the most feasible region because it contains the most of both foods.
process in images:
For this page for the cookies final project you will be giving a step by step solution to your own cookies problem. Your solution page should have all of the following:
- Steps labeled
- Tables outlining all of your constraints
- Screenshot of your feasible region in desmos, and the link to your desmos graph
- A list of possible best solutions and profits for each.
- One sentence stating which solution is best.
- Find the price of all the ingredients
- Find how much you can make with your materials
- Divide the total price of ingredients by how much you can make with the ingredients and find the cost per 1 pizza/1 hotdog
- Find how much time you need to cook it
- Find sell price (cost + (markup % (300%))+ cost (again)))
- Find constraints
- Make inequalities
- Make a desmos
https://www.desmos.com/calculator/xe2nlsqjxn
All possible solutions:
- (0,84)
- (93.333,0)
- (392.491,-269,242)
- Find most feasible region
(93.333,0)
This is the most feasible region because it contains the most of both foods.
process in images:
Reflection:
Write one full paragraph answering one of the following questions. For your response, you must provide evidence and adequate analysis showing how evidence supports your answer.
The cookies project that finished up recently has had the opportunity to give us an insider to mathematics in the real world. And personally, the best example of real world mathematics during the cookies project would have to be finding the sell price. The best example of this is Walmart. As you know, Walmart is a massive company and their stores are everywhere, and almost everyone (at least in the United States) shops there. But how does Walmart make so much money? Well, My project was about a grocery store trying to compare the price of pizza ingredients to hot dogs. And at some point, they determine the selling price of each hot dog/pizza by multiplying the cost by the markup percentage and the cost again. So pretty much, Walmart makes its money by marking up it’s products by a few extra dollars based on a certain formula. Of course with the addition of how many people shop there on a regular basis. Overall, the cookies project is a good insider into how the business world works.
Write one full paragraph answering one of the following questions. For your response, you must provide evidence and adequate analysis showing how evidence supports your answer.
- In what ways has the cookies project helped you gain perspective on doing real world mathematics?
- What was something that led to a deeper understanding of the problem and why?
- What is something challenging for you during this unit, and how did you overcome that challenge?
- What is something you are proud of from this unit, and if you were to do this project again how would you refine it further?
The cookies project that finished up recently has had the opportunity to give us an insider to mathematics in the real world. And personally, the best example of real world mathematics during the cookies project would have to be finding the sell price. The best example of this is Walmart. As you know, Walmart is a massive company and their stores are everywhere, and almost everyone (at least in the United States) shops there. But how does Walmart make so much money? Well, My project was about a grocery store trying to compare the price of pizza ingredients to hot dogs. And at some point, they determine the selling price of each hot dog/pizza by multiplying the cost by the markup percentage and the cost again. So pretty much, Walmart makes its money by marking up it’s products by a few extra dollars based on a certain formula. Of course with the addition of how many people shop there on a regular basis. Overall, the cookies project is a good insider into how the business world works.
Tesselation project
Cover letter
Throughout the duration of this project in the Math 10 Class within the teaching of Mr. Andrew Loyd which lasted an estimated amount of over 1 month or approximately 30 full length days. The entirety of this class full of 17 boys and 8 girls, the teacher more commonly referred by the students and everyone else including me as a shortened version of his first name which is referred to as “Ande” has taught this class full of sophomore year high school students a plethora of topics that revolved around geometric shapes, which eventually culminated in to a big final project which involved all 25 sophomore students to create a pattern of shapes that were non periodic, which means that it cannot recur at regular intervals and it has to tessellate across the pattern via several means. (translation, reflection, rotation, etc)
Now that you are aware of the existence of these unique patterns, you now must be quite familiarized with the final part of the project we have 10th graders have done, so now I must give you some insight on two of the topics we sophomores have studied during the lead up to creating these tessellations.
The first topic I will be covering is the efficiency of shapes. Shapes and their efficiency depend on mainly 2 things, the volume (the space that is contained from within the shape) and the area (the basic size of the shape). For these to be reliable, the shape has to take up the least amount of space possible to fit the most essential material possible for that size. And so what is the shape that does this the best? You would probably think that it is the square, but no, squares take up too much space, it is the hexagonal shape actually that can fit the most essential sustenance within possible enough to fit a relatively smaller space. The best example of the hexagon’s reliability is the creature known as the Apis, but we will just call them by their more common name, the honeybee. The honey bee's honeycomb is famous for its hexagonal shape, which is used to fit the most honey possible at a reliably smaller size.
The second and last topic I will be covering will be finding the area of an N-sided polygon, and for this, I will be covering the most basic and most important n sided polygon, the triangle. The triangle is what makes up N sided polygons, so I must be explaining what these are. To find the area of a triangle, you have to multiply the length and the height of the triangle, just like how you would find the area of a different n sided polygon, the square, but the important thing you need to know is that a triangle is half of a square, so now you need to divide the area you got of the triangle by 2, then you have gotten your answer. IMPORTANT NOTE, that is mainly how you find a right triangle, if it is not a right triangle, you use a different method of finding the height of the triangle

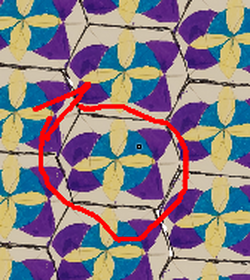
original tessellation
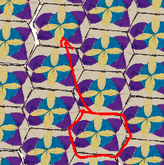
translation
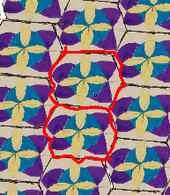
reflection
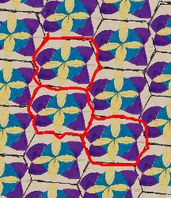
glide reflection
rotation
Reflection
Since this project is now over with, I gotta say, this was easier than I thought it would be. When this project started, I expected to get the biggest headache I have ever endured due to having to come up with a unique tessellation. So as it was announced, I was glad we were going to do it later on. But when we actually got to making the tessellation, boy was I surprised at how easy making one was. Not only was mine made with ease, but it answered the unit question, fitting multiple circles, lines, and curves within it while taking up a smaller space.
How do you think you have grown in your understanding of geometry?
I have gained an understanding of how geometry works out in the wild. The best example of this being of course the bees’s use of hexagons, using it to store the most honey possible in a small space.
How do you think you have grown in your understanding of geometry?
I have gained an understanding of how geometry works out in the wild. The best example of this being of course the bees’s use of hexagons, using it to store the most honey possible in a small space.
